


12th Nov 2025
How Do You Remove Mould from Material Without Causing Damage?
Mould can grow on many different materials, and using the wrong cleaning method can easily cause damage. This guide explains how to remove mould safely from common household materials, what to avoid, and when professional help may be needed.
Mould doesn’t just grow on walls, it can also appear on a wide range of household materials, from wood and plaster to concrete, brick, and painted surfaces. The tricky part is that different materials react differently to moisture and cleaning products, which means the wrong approach can leave marks, cause staining, or even damage the surface.
So, how do you remove mould from material safely? The best method depends on whether the material is porous or non-porous, how deep the mould has spread, and what’s causing the moisture in the first place.
In this guide, we’ll break down the safest ways to treat mould on common materials, what to avoid, and when it’s time to call in a professional.
If the mould you’re dealing with is mainly on painted walls, follow our main guide on how to remove mould from walls first.
First: Check What Type of Material You’re Cleaning
How do you remove mould from material when you’re not sure what the surface is made from? A good starting point is to identify whether it’s porous or non-porous, as this affects how deeply mould can spread and how gently the surface needs to be treated.
A simple way to think about it is:
- Porous materials can absorb moisture, so mould can grow deeper below the surface
- Non-porous materials don’t absorb water easily, so mould usually sits on top and is easier to remove
If you’re unsure, look closely at the surface. If it feels rough, chalky, fibrous, or unfinished, it’s more likely porous. If it feels smooth, sealed, or glossy, it’s more likely non-porous.
Porous Materials (Mould Can Soak in Deeper)
Porous materials absorb moisture, which makes mould harder to remove completely, especially if the area has stayed damp for a long time. On these surfaces, mould can grow not only on the surface, but also into small gaps, fibres, or cracks.
Common porous materials include:
- Untreated wood
- Plaster
- Cement or concrete (especially rough concrete)
- Grout or masonry
- Unsealed brick
Because mould can sit deeper within the material, porous surfaces often need:
- repeat treatments
- longer drying time
- extra focus on preventing moisture returning
Non-Porous Materials (Usually Easier to Clean)
Non-porous materials don’t absorb moisture in the same way, so mould is often easier to treat. In many cases, it stays on the surface and can be removed with the right product and a careful wipe-down.
Common non-porous materials include:
- Tiles
- Glass
- Sealed stone
- Metal
- Gloss-painted surfaces (in many cases)
These surfaces usually respond well to:
- applying a mould remover
- wiping gently with a damp cloth or sponge
- drying the area properly afterwards
Tip: Even on non-porous surfaces, mould can come back if moisture is still present, so drying and ventilation are still essential.
What to Do Before Cleaning Mould from Any Material
Even though cleaning methods vary, the preparation steps are similar across materials.
Before cleaning mould, make sure you see this quick safety checklist:
- Open windows for airflow
- Wear gloves
- Consider a mask if the mould is widespread
- Avoid dry brushing mould (it can release spores into the air)
If you’re working with stronger cleaning sprays, ventilation matters even more.
How Do You Remove Mould from Material? (Best Methods by Surface Type)
Removing mould from wood (furniture, skirting boards, frames)
Wood is a common material for mould because it holds moisture and can stay damp for long periods, especially behind furniture or near windows.
Best approach:
- Wipe with a damp cloth (don’t soak the wood)
- Use a suitable mould remover that’s safe for wood finishes
- Dry immediately afterwards
Avoid:
- Over-saturating wood (can warp or stain)
- Heavy scrubbing (can damage varnish or paint)
If mould keeps returning on wood, it often means the surrounding air is too humid or the wood is in a “cold spot” with condensation.
Removing mould from plaster and painted surfaces (non-wall specific)
Plaster is a more delicate material, and cleaning too aggressively can cause flaking or a rough patch, especially on older surfaces.
Best approach:
- Use a mould spray suitable for interior surfaces
- Let it sit as directed
- Wipe gently with a soft cloth or sponge
- Dry thoroughly
If the plaster is soft, crumbling, or the paint is bubbling, the moisture may be coming from behind the surface which may need more than surface cleaning.
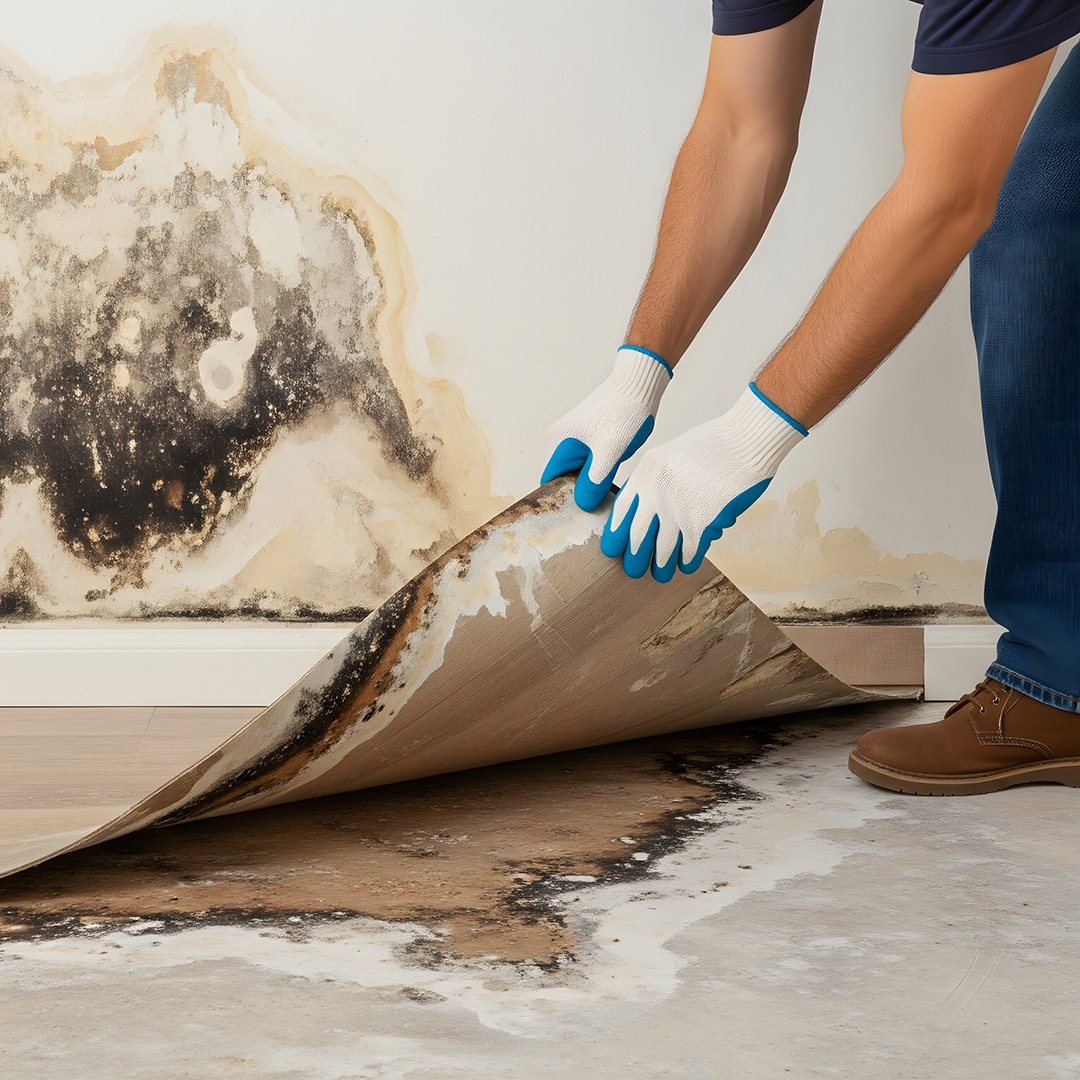
Removing mould from concrete, brick, or masonry
Concrete and masonry surfaces can be deceptively difficult. Even though they seem “solid,” they’re often porous and can hold moisture, especially in basements, garages, or older properties.
Best approach:
- Apply mould remover carefully to the affected area
- Use a stiff brush only if the surface can handle it (rough concrete usually can)
- Rinse/wipe as needed (follow product instructions)
- Dry completely and address ventilation/humidity
Common mistake: cleaning the visible mould but leaving the area damp, which causes it to return fast.
Removing mould from tiles and grout
Tiles are usually easy to clean, but grout is porous and holds mould more stubbornly.
Best approach:
- Use a mould spray that targets mould and mildew
- Let it sit long enough to work
- Scrub grout gently with a small brush
- Rinse and dry
If mould returns quickly around tiles, poor ventilation (especially in bathrooms) is often the cause.
What If Mould Keeps Coming Back on the Same Material?
If you keep removing mould from the same area and it keeps returning, the problem usually isn’t the material itself, it’s the conditions around it. Mould grows when moisture is consistently present, so even the best cleaning method won’t stop it long-term if the space stays damp.
In many homes, recurring mould is caused by indoor humidity that’s too high, condensation forming on colder surfaces, or poor airflow behind furniture where walls and materials take much longer to dry. In other cases, the moisture may be coming from a hidden leak around windows, pipework, or even the roof. Older buildings can also experience damp problems that create the perfect environment for mould regrowth.
If mould keeps coming back even after you’ve cleaned it properly, the most effective next step is to focus on moisture control by improving ventilation, reducing humidity with a dehumidifier, and addressing any leaks or damp issues that may be feeding the problem.
When You Should Call a Professional
DIY mould cleaning is often fine for small, surface-level patches, especially when you can clearly see what’s affected and the area dries out properly afterwards.
However, there are situations where mould may be a sign of a bigger issue and professional advice can help you deal with it safely and prevent it returning.
You should consider contacting a professional if:
- The mould covers a large area (for example, if it has spread across a full wall section or multiple areas in the room)
- You suspect mould is behind surfaces, such as behind wallpaper, plasterboard, cupboards, or under flooring
- The material is deteriorating, including soft or crumbling plaster, warped timber, or wood that looks like it’s starting to rot
- The mould keeps returning quickly even after cleaning, which may indicate an ongoing leak, damp issue, or trapped moisture
- Anyone in the household is high-risk, such as people with asthma, allergies, respiratory conditions, or a weakened immune system
A professional can help identify the moisture source (which is often the real cause), assess whether the mould is only surface-level, and recommend the safest long-term fix.
Final Thoughts: Removing Mould from Material Safely
So, how do you remove mould from material without causing damage? The safest approach is to match the cleaning method to the surface you’re working on, avoid harsh scrubbing on delicate materials, and make sure everything is fully dried afterwards.
Our professional opinion: the biggest mistake we see is people treating mould like a one-off cleaning problem, when it’s usually a sign of ongoing moisture. Even if the surface looks better after wiping it down, mould often returns if condensation, humidity, or hidden damp hasn’t been dealt with properly.
In many cases, fixing airflow and moisture levels makes a bigger long-term difference than repeatedly using stronger and stronger products.
If you’re cleaning mould from multiple surfaces in the home, it’s also worth checking whether the same moisture issue is affecting nearby walls, windows, or cold corners.
How do you remove mould from material and stop it from coming back? In most cases, the long-term fix comes down to drying the area properly and improving ventilation, especially on surfaces that stay damp or sit in cold spots around the home.
If mould is mainly affecting painted rooms or interior walls, follow our main step-by-step guide on how to remove mould from walls.
For clothes, curtains, upholstery, and soft furnishings, read our guide on how to remove mould from fabric.
Removing mould is only part of the solution, preventing it coming back is just as important. Visit your local Get Kitted Out Approved Stockist to get expert guidance and the right products for long-term mould control.